How to Print Large Posters From Digital Art Without Losing Quality
You've created a stunning piece of digital art — now you want to see it printed large, framed on a wall, or shipped to a customer. But when that file hits the printer, the result is blurry, pixelated, or washed out. Sound familiar?
Printing large-format posters from digital art is entirely achievable without sacrificing quality — but it requires understanding a few key principles before you ever hit "send to print." This guide covers everything from file resolution to color profiles, so your artwork looks just as good at 24×36 inches as it does on screen.

Why Digital Art Loses Quality When Printed Large
The root cause of most print quality issues comes down to one word: resolution. Digital screens display images using pixels, and monitors have relatively low pixel density — typically 72 to 96 PPI (pixels per inch). Print, on the other hand, requires 150 to 300 PPI or higher to look sharp to the human eye.
When you scale a low-resolution digital file to poster size, the printer has to "invent" pixel data to fill the gaps — a process called upsampling or interpolation — and the result is soft edges, visible pixelation, and lost detail.
The good news: if you set your files up correctly from the start (or use the right tools to prepare them), large poster prints can look razor sharp.
Step 1: Start With the Right Canvas Size and Resolution
The single most important thing you can do is work at print resolution from the beginning. If you're creating new artwork intended for large-format print, set your canvas to the final print dimensions at 300 DPI (dots per inch).
Recommended settings for large poster printing:
- Resolution: 300 DPI for most inkjet and fine art prints
- Minimum acceptable resolution: 150 DPI for posters viewed from a distance (24 inches or more)
- Canvas size: Set at the actual final print size (e.g., 24×36 inches at 300 DPI)
- Color mode: RGB for digital proofing; convert to CMYK before sending to the printer
For example, a 24×36 inch poster at 300 DPI requires a canvas of 7,200 × 10,800 pixels. That's a large file — which is exactly what you want.
Step 2: Use Vector Elements Where Possible
Vector graphics are resolution-independent, meaning they can be scaled to any size without losing sharpness. If your artwork includes text, geometric shapes, icons, or logos, keep those elements as vectors for as long as possible in your workflow.
Programs like Adobe Illustrator, Affinity Designer, and Inkscape are built for vector work. Even if you're working primarily in Photoshop or Procreate, exporting certain elements as vector SVG or EPS files and compositing them at the end can dramatically improve final print quality.
Raster artwork (photography, painterly textures, grain effects) must be handled properly, which brings us to the next step.
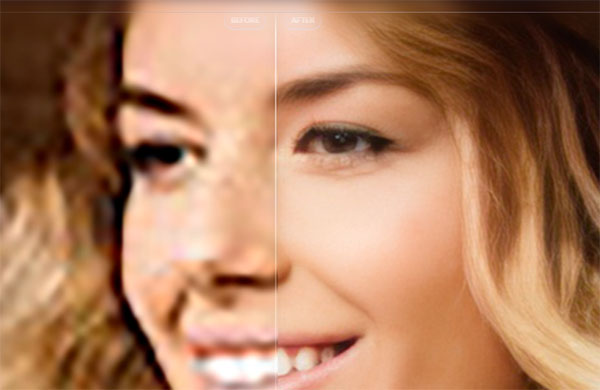
Step 3: Upscale Existing Artwork With AI
Already have a finished piece at a smaller size? AI-powered upscaling tools have changed the game for print preparation. Unlike traditional bicubic or bilinear interpolation, AI upscalers analyze image content and intelligently reconstruct detail (fixing resolution issues)— often producing results that look genuinely sharper than the original.
Best AI upscaling tools for print preparation:
- Topaz Gigapixel — Industry standard for print upscaling; can enlarge images 6× or more while preserving fine detail
- Adobe Photoshop Super Resolution — Built into Camera Raw; doubles resolution with impressive results
- ON1 Resize AI — Designed specifically for print enlargement workflows
- Upscayl — Free, open-source option with solid results for most artwork types
As a general rule, aim to upscale no more than 2–4× in a single pass. Stacking multiple moderate upscales often produces cleaner results than one extreme enlargement.
Step 4: Choose the Right File Format for Your Printer
File format matters more than most artists realize. Saving or exporting in the wrong format can introduce compression artifacts, strip color data, or flatten important metadata.
File format guide for large poster printing:
- TIFF (.tif) — Best overall choice for print. Lossless compression, supports layers, wide color depth support. Preferred by professional print labs.
- PDF — Ideal when you need to preserve vector elements alongside raster artwork. Most commercial printers and Shopify print-on-demand integrations accept PDF.
- PNG — Lossless, good for digital art without photographic elements. Widely accepted but lacks some color management features of TIFF.
- JPEG — Acceptable only if saved at maximum quality (level 12 in Photoshop). Avoid for anything that will be printed very large due to lossy compression.
Avoid: Screen-optimized exports (72 DPI JPEGs), heavily compressed WebP files, and GIFs for any print workflow.
Step 5: Manage Your Color Profile Correctly
Color management is where many beautiful prints go wrong. What looks vibrant on your monitor can print dull, too dark, or with an unexpected color cast if you haven't set up your color profile correctly.
Key color management concepts for print:
- RGB vs CMYK: Screens display in RGB (Red, Green, Blue). Most inkjet and fine art printers also accept RGB and convert internally, but it is not perfect. Many commercial printers require CMYK files. Using CMYK helps small and large art prints of your artwork match better.
- sRGB: Safe default for online print-on-demand services (Printful, Gelato, Printify). When in doubt, export as sRGB.
- Adobe RGB: Wider color gamut — better for inkjet fine art printing if your printer and RIP software support it.
- Soft proofing: Use Photoshop or Affinity Photo's soft proofing feature to simulate how your artwork will look under a specific printer profile before you send the file.
Always request an ICC profile from your print lab and load it into your soft proofing setup. This single step can save you from expensive reprints.
Step 6: Add Bleed and Check Safe Zones
If your poster will be trimmed after printing — as most are — you need to add bleed to prevent white edges from appearing on the final product.
- Standard bleed: 0.125 inches (3mm) on all sides for most print labs
- Safe zone: Keep all critical elements (text, faces, focal points) at least 0.25 inches from the edge
- Full bleed designs: Extend background colors and patterns all the way to the bleed edge — never stop at the trim line
Most professional design programs (Illustrator, InDesign, Affinity Publisher) have built-in document bleed settings. If you're working in Photoshop or Procreate, add the bleed manually by expanding your canvas before export.
Step 7: Choose the Right Paper and Print Method
The print medium you choose has as much impact on the final result as the file itself. Different paper stocks interact with ink in very different ways, and the "right" choice depends entirely on your artwork's style.
Common large-format print media for digital art:
- Textured fine art paper: Archival, gallery-quality, no glare. Best for painterly, illustrative, and photographic artwork. Slightly muted color saturation.
- Lustre/semi-gloss photo paper: Vibrant colors, sharp detail, minimal glare. Great all-rounder for most digital art styles.
- Glossy photo paper: Maximum vibrancy and contrast. Can show fingerprints and glare — best for work with bold, saturated color.
- Canvas & Watercolor: Textured, painterly feel. Excellent for digital oil or acrylic-style artwork. Requires slightly higher resolution files due to texture absorption.
- Metallic paper: Striking luminous effect. Works especially well for fantasy, sci-fi, and high-contrast artwork.
Step 8: Order a Test Print Before Committing to a Full Run
Before printing 50 copies of anything, order a single proof print. A physical proof reveals color shifts, sharpness issues, and unexpected cropping that no monitor can show you — no matter how well-calibrated your display is.
Most professional print labs offer proof prints at regular per-unit pricing. For large-format work, this is always money well spent. Check the proof in natural daylight and under artificial lighting, as color rendering changes significantly between light sources.
Quick Reference: Large Poster Print Checklist
- Canvas set to final print dimensions at 300 DPI (or minimum 150 DPI)
- Vector elements are kept as vectors where possible
- Apply AI upscaling if the original file was created at a smaller size
- File exported as TIFF or PDF (lossless)
- Color profile set correctly for your printer (sRGB or Adobe RGB for inkjet; CMYK for offset)
- Bleed added (0.125 inches minimum on all sides)
- Critical content kept within safe zone
- Soft proof reviewed against printer ICC profile
- Single proof print ordered before full production run
Can Your File Print Large?
Use these quick checkpoints before ordering a large poster.
You are usually in good shape for an 18×24 poster.
You are usually in good shape for a 24×36 poster.
It may still print well for short viewing distances or slightly smaller poster sizes.
Your poster may look blurry or pixelated when enlarged.
Final Thoughts
Printing large posters from digital art without losing quality isn't complicated once you understand the core principles: start big, stay lossless, manage your color, and always proof before you produce. Whether you're selling prints through your own Shopify store, fulfilling orders through a print-on-demand partner, or printing gallery pieces yourself, these steps give you the best possible foundation for a result that does justice to your work.
The gap between what you see on screen and what lands on paper can be frustratingly wide — or, with the right preparation, almost nonexistent. Set your files up correctly once, build it into your workflow, and every print run after that becomes straightforward.
